Self-hosted analytics platform with Umami, Supabase, and Vercel
A complete guide to setup a self-hosted, privacy-focused alternative to Google Analytics platform with Umami, Supabase and Vercel for free.
Are you tired of using website analytics platforms that compromise your users' privacy and deal with consent banners on your website? Do you want to build your own analytics platform that respects your users' privacy and gives you full control over your data? If so, then this guide is for you.
Traditional website analytics platforms often compromise user privacy by tracking user data without their consent or knowledge and storing it on servers the user has no control over. While there are privacy-respecting platforms available like Plausible, sometimes all you need is a basic user traffic analytics system that is easy to set up and use.
In this article, I will explore how to build your own privacy-focused website analytics platform using open-source tools like Umami, Supabase, and Vercel. With this guide, you can learn how to create a platform that respects user privacy, gives you full control over your data, and is accessible to everyone.
Why Umami?
Umami is a great choice for a privacy-focused website analytics platform because it is open-source and easy to set up. It provides all the basic features you need to track user traffic and customize your analytics.
One of the key benefits of using Umami is that it is lightweight (package size) and fast, which means it won't slow down your website. Additionally, Umami is designed to be privacy-focused, which means it doesn't collect any personally identifiable information (PII) from your users. This is important because it helps you comply with data privacy regulations like GDPR and CCPA.
Umami provides a clean and intuitive user interface, making it easy to navigate and understand your analytics data. You can view your website traffic by day, week, or month, and see which pages are the most popular. You can also see where your traffic is coming from, including countries, cities, and referral sources. Umami also provides real-time analytics, which means you can see your traffic data updated in real-time as users visit your site.
Prerequisites
Git version control system installed
A free subscription of Vercel account
A GitHub account
A Supabase account
yarn package manager: install with
npm install -g yarn
Step 1: Setup Supabase
Supabase is an open-source backend-as-a-service platform that makes it easy to build serverless applications. We will use Supabase to store our analytics data.
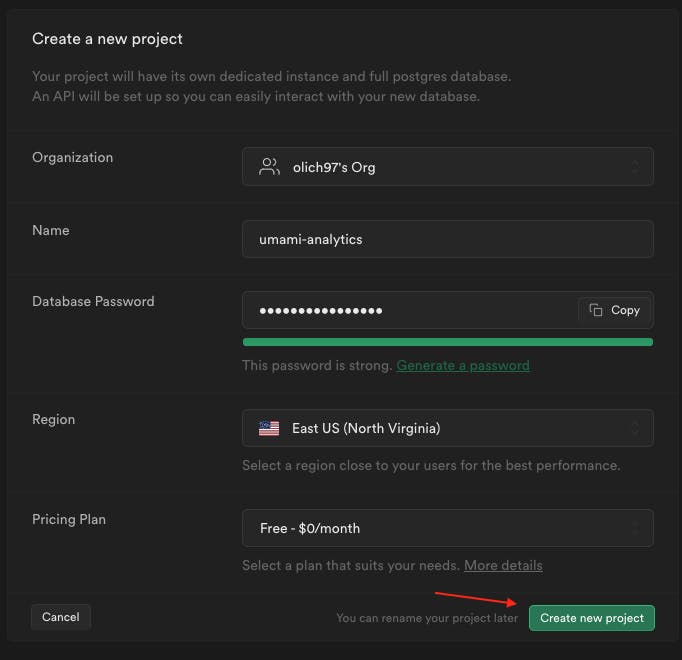
Login to Supabase and create a new project in a target region:

Go to Project Settings > Database page of the newly created project.
Copy the connection string from Connection Polling Section:

Add
?pgbouncer=trueto the connection string you just copied and save it for later:
postgres://postgres:[YOUR-PASSWORD]@db.blablabla.supabase.co:5432/postgres?pgbouncer=true
Step 2: Setup Umami
Go to Umami GitHub repository
Fork the repository
Clone the forked repository locally:
git clone https://github.com/olich97/umami.git
- Go to cloned folder and create a
.envfile in the root of the repository with the content (connection string to the supabase database created at Step 1):
DATABASE_URL=postgres://postgres:[YOUR-PASSWORD]@db.blablabla.supabase.co:5432/postgres?pgbouncer=true
- Install dependencies:
yarn install
- Build the project:
yarn build
- Start the project:
yarn start
- Follow the first Login guide and change your default username and password
Step 3: Deploy Umami on Vercel
Login to your Vercel account
Add new project
Choose, cloned at Step 2, umami repository:

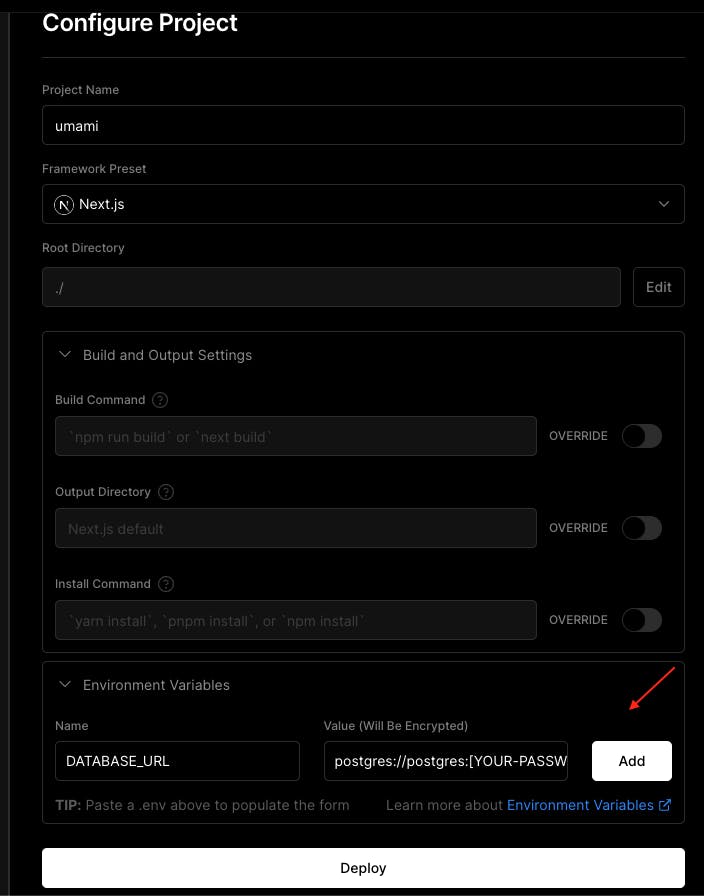
In the configuration page, under Environment Variables, specify your
DATABASE_URLvariable:
Press Deploy

Vercel will assign a random domain to the deployed website. Follow the guide to set up a custom domain.
Step 4: Track your website
Login to the newly deployed Umami frontend
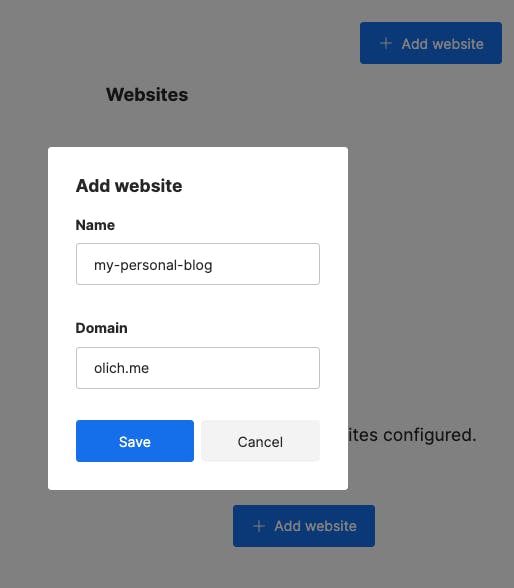
Create a new website: Settings -> Websites -> Add Website.

Get the tracking code: Settings -> Websites -> Your Website -> Edit -> Tracking Code.
Add the script to the website you want to track.
Enjoy!
For more about umami's capabilities read the documentation.
Conclusion
By using Umami, Supabase, and Vercel, you can create a simple platform that respects user privacy and gives you complete control over your data. Open-source tools allow you to create an analytics platform that is accessible to everyone, regardless of budget or technical expertise. So, go ahead and give it a try!

